
Whether you're camping or hiking with a group, or backpacking alone - this post is for everyone who needs an easy step-by-step way to care for their sleeping pad.
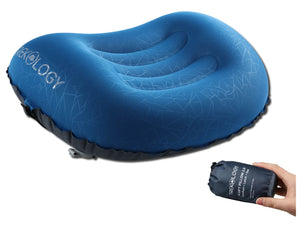
Sleeping pads such as our "UL140 Thick Air Sleeping Mat" are great for outdoor comfort! But they can get dirty and need to be repaired. This article will introduce you to some tips and tricks for maintaining your sleeping pad as well as offer information on what to look for when shopping for a new one. And we will also answer some common questions like - How to clean a sleeping pad? What should I do if my inflatable sleeping pad gets a puncture? How to store a sleeping pad? Keep reading for more information on taking care of your sleeping pad.
Related: A Quick Guide to Self-Inflating Sleeping Pads
Follow these easy steps to keep your sleeping pad in tip-top shape for years to come.
How to clean a sleeping pad?
Sleeping pads can be a great source of discomfort if not washed regularly. Dirt particles and oils from your hair and skin will build up over time on your sleeping pad. This causes it to lose its ability to insulate effectively as well as make it smell less than pleasant. Cleaning your sleeping pad can seem like an impossible task, especially if it's been through some rough times. But with the right knowledge and tools, you'll be able to get it looking fresh in no time! Here are a few tips on how to clean a sleeping pad.
If you have a self-inflating sleeping mat, the first thing you want to do is remove the valve from the bottom of the pad so that air can flow through the foam core. Next, follow the instructions for whichever type you own. For synthetic pads: Machine wash on gentle cycle using mild detergent, then tumble dry on low heat setting (or hang outdoors to air dry). For foam pads: Hand-wash in cold water with soap or other cleaning agent specified by the manufacturer.
Related: How to extend the life of your outdoor gear?
Be sure to take off any straps or belts that might have collected dirt over the years. Then use cold water mixed with mild soap to wash away any stains or smells that may be lingering on your pad. You can also use rubbing alcohol if there are tough stains that won't come out with just water alone. Generally, it's best to clean your sleeping pad after every trip or two if it gets dirty enough. Also, drying will be quicker if you use soapy water rather than plain water in order to rinse off any residue before laying it out in direct sunlight to dry.
As you can see, cleaning your sleeping pad doesn't have to be difficult or take hours out of your day. All we need is some water, soap, and maybe even some baking soda! If bugs are an issue for you then spray some insect repellent onto the damp cloth before wiping down your sleeping mat. You should shake out excess water after cleaning so that it doesn't pool inside the fabric during use.
Related: How to choose the best sleeping pad?
How to repair a sleeping pad?
Even the best sleeping pad will wear down over time with use and need occasional repairs to maintain its functionality. And it’s not always possible to replace a sleeping pad because it can be expensive. Luckily for you, there are many methods you can use that will work depending on your level of comfort with repairs. Here we'll cover some common DIY fixes that anyone could try.
First things first - identify what is wrong with your pad. Check each section for rips or tears. If there are no signs of wear and tear, check the seams where two pieces meet at their edges. Inflatable pads have two basic components: an air chamber that holds the air and a fabric outer layer that provides insulation from the ground below. The problem typically arises when one of these components fails - either because it's punctured by rocks or roots underfoot (which is easily fixed with duct tape), or because it just gradually loses its inflation over time. Check out this blog post to find out how you can identify common problems with your inflatable mattresses!
Inspect the leak carefully by looking for bubbles on the surface of the mat. It's always best to patch leaks in an inflatable mat before they get worse. A simple patch kit will have everything you need including patches, adhesive, and instructions for how to make a sealant using dish soap. Take the pad out and lay it on the ground so that the hole is facing up. Use tape or glue (if necessary) to cover any exposed surfaces around the hole before flipping over the pad carefully. Once flipped over, use duct tape or another strong adhesive tape along with a piece of fabric large enough to cover both sides.
Repairing a sleeping pad/mat is relatively simple as long as you have the right tools and supplies on hand! There are many household items available that will help patch up leaks and keep your bedding dry. Here are some of the most common items found in every home: duct tape, silicone sealant, petroleum jelly or Chapstick, dish soap (liquid dish soap), hair spray, or hair gel (with alcohol content), toothpaste (gel toothpaste works best) and talcum powder.
Related: How do you fix a hole in a sleeping pad?
How to store a sleeping pad?
Now let's go over some storage solutions so that your sleeping pads stay fresh and ready to use on your next adventure! Storing your pad appropriately increase its lifespan by preventing potential damage from occurring during transport.
Many people will fold up their pads in half before rolling them up tightly (and sometimes strapping them with bungie cords). However, this can cause long-term damage to the material. A better method is to roll up the sleeping pad like a burrito with the closed end facing outwards (the opening should face towards you). Then fold it over one more time before rolling again for good measure. This will create a tube-like shape that can then be stored away in its original sack or inside another bag with clothes or other items.
Be sure to store your sleeping pad in an area where there's plenty of air circulation so no moisture accumulates. You should also try not using your sleeping pad on damp ground or near any creeks or other bodies of water because this could increase the likelihood of mold growth which would make storing your pads more difficult. Don't forget to deflate and dry your sleeping pad before rolling it since dampness can lead to mildew growth inside of the mat which will.
Conclusion

As outdoor enthusiasts, we know how important it is to take care of our gear. Without proper care and maintenance of sleeping pads your sleep will be compromised and uncomfortable. If you want to avoid having an unpleasant experience while out in nature, follow the above-mentioned steps to properly clean, repair, and store your sleeping pad. Read through them carefully and make sure that you understand what needs to be done. Have fun camping!
Hungry for more?


A. Disgruntled Customer
October 31, 2023
There is NO information on how to actually repair your bed. Don’t waste your time reading this post. It seems to have been written by Chat GPT.